
DOME: Learning through a process of enablement.
Paper presented to Australian Building Education Association Conference 2001, Hahndorf SA.

Reflection: This is a paper I wrote with Mark Dewsbury outlining the educational process for enabling University of Tasmania architecture students to learn technical decision-making for a project designing and constructing a mud brick dome in a forest reserve near Lilydale in northern Tasmania in 2000.
Mark was a mature age student at the time, and had extensive earth building experience from having built his own mud brick house in the New England region of NSW. Mark is now Dr Mark Dewsbury and a Senior Lecturer in Architecture at University of Tasmania at Launceston. Mark is also a subscriber to Second Nature!
Building this dome was a crazy, risky yet purposeful process, not just because of building a desert-climate earth dome in a cool temperate forest where it rains a lot, but especially because students carried out most of the decision-making about design and process. This could have been a disaster, but it wasn’t!
We had so much fun designing and building the dome and this paper captures some of that spirit. I have added some reflective comments throughout the text as appropriate.
Abstract
This paper describes a Learning-by-Making Studio conducted by the School of Architecture at the University of Tasmania at Launceston, Australia.
This Studio was as much about the process as the product. Students were given the freedom to make their own decisions about technical issues and about constructional process. This created space for students to make mistakes so that reality could be the teacher, and the students learn through their own experiences.
Student evaluation of the studio indicated a high level of satisfaction and appreciation of the process of making their own decisions.
Introduction
The DOME studio was an extension of the successful Learning-By-Making Program in the Bachelor of Arts (Environmental Design) in the School of Architecture at the University of Tasmania at Launceston. The DOME Studio was offered in Semesters One and Two of 2000. Most building projects in the Learning-By-Making Program have focussed on lightweight materials, fabricated substantially in the Architecture Workshop with minimal time spent on site. In contrast, the DOME Studio changed this emphasis by focussing on a site-based, hand-made, mass material project with a much longer time involvement compared to other Learning-By-Making Studios.
Objectives
The objectives of the DOME Studio were to develop:
An appreciation of the issues involved in the design and construction of buildings for the majority world
A working knowledge of common technical strategies for building with earth and other low embodied energy, natural and local materials
An understanding of how to develop strategies which facilitate a building project
An understanding of the issues of self-help building and local participation, and how these can support community development
Manual skills in basic earth building and other techniques
An ability to work in groups
Location
The site is the School of Architecture’s experimental building facility at Hollybank State Forest, about 15km north-east of the University’s Launceston Campus, on the Lilydale Road. The site is in a sub-alpine eucalypt re-growth forest above 400m altitude, below the adjacent peak of Mt Arthur, some 1200m above sea level.
Reflection: Hollybank has since been developed with a mountain bike park, a ropes course, and walking tracks. I am not 100% sure about the fate of the patch of open land that was loaned to UTas Architecture for experimental building. I was told that a few years after construction, the dome collapsed, and the immediate site had to be fenced off. I’m not sure of the fate of the timber structures built by students in previous Learning-by-Making studios.
Methodologies
General Process
The Studio was planned as a one-semester project, but there was scope to extend it into a second semester if necessary. Students were only required to commit to one semester.
Twenty students participated in Semester One, eleven in Semester Two. There were seven students continuing from Semester One.
The Lecturer resisted pre-empting student decision-making by proscribing processes and techniques even though this would have enabled construction to start sooner (other than that the building would be made from earth and it would be a dome).
This Studio was as much about the process as the product. Students were given the freedom to make their own decisions about design, techniques and processes. This created space for students to make mistakes so that reality could be the teacher, and the students learn through their own experiences. As a result, it was important for the lecturer (also the principal author) to take a back seat in the process, and to resist directing the process as much as possible. Students also had the responsibility of following through on agreed tasks to ensure the process maintained momentum.
Students had flexibility in attendance, especially with regard to extra sessions that were scheduled on some weekends. Students could make up hours if they missed days during the week.
Reflection: This was in some ways more challenging than I thought it would be. However, once students understood what it meant to actually make decisions and follow through with them, things progressed smoothly for the most part.
Research Process – Initial Phases
During Weeks 1 and 2 of Semester One, students divided into small groups for intensive research. This allowed for a quick and efficient interchange of information within the group. The specialist research groups informed the rest on the particulars of their findings.
Some students started pushing for an early start to the design process, wanting the design process to throw up the issues for further research. The group decided that the gaps in the knowledge could be dealt with as the project unfolded.
Design Process
The Design Phase occurred over Weeks 3 and 4 of Semester One, with students working individually or in small groups in order to develop designs based on the information identified in research.
The design process was driven by modelling, using potter’s clay, with focus on the trialling of some of the techniques and patterns for dome and vault building. Students were required to make decisions of size, scale, technology and buildability.
Individuals sketched ideas, forms and sizes. The modelling phase provided a useful visual and constructional exploration of the sketches that people had drawn. It was broken up into two stages:
An exercise in form-making based on individuals explorations.
An exercise of designing to scale with miniature bricks.
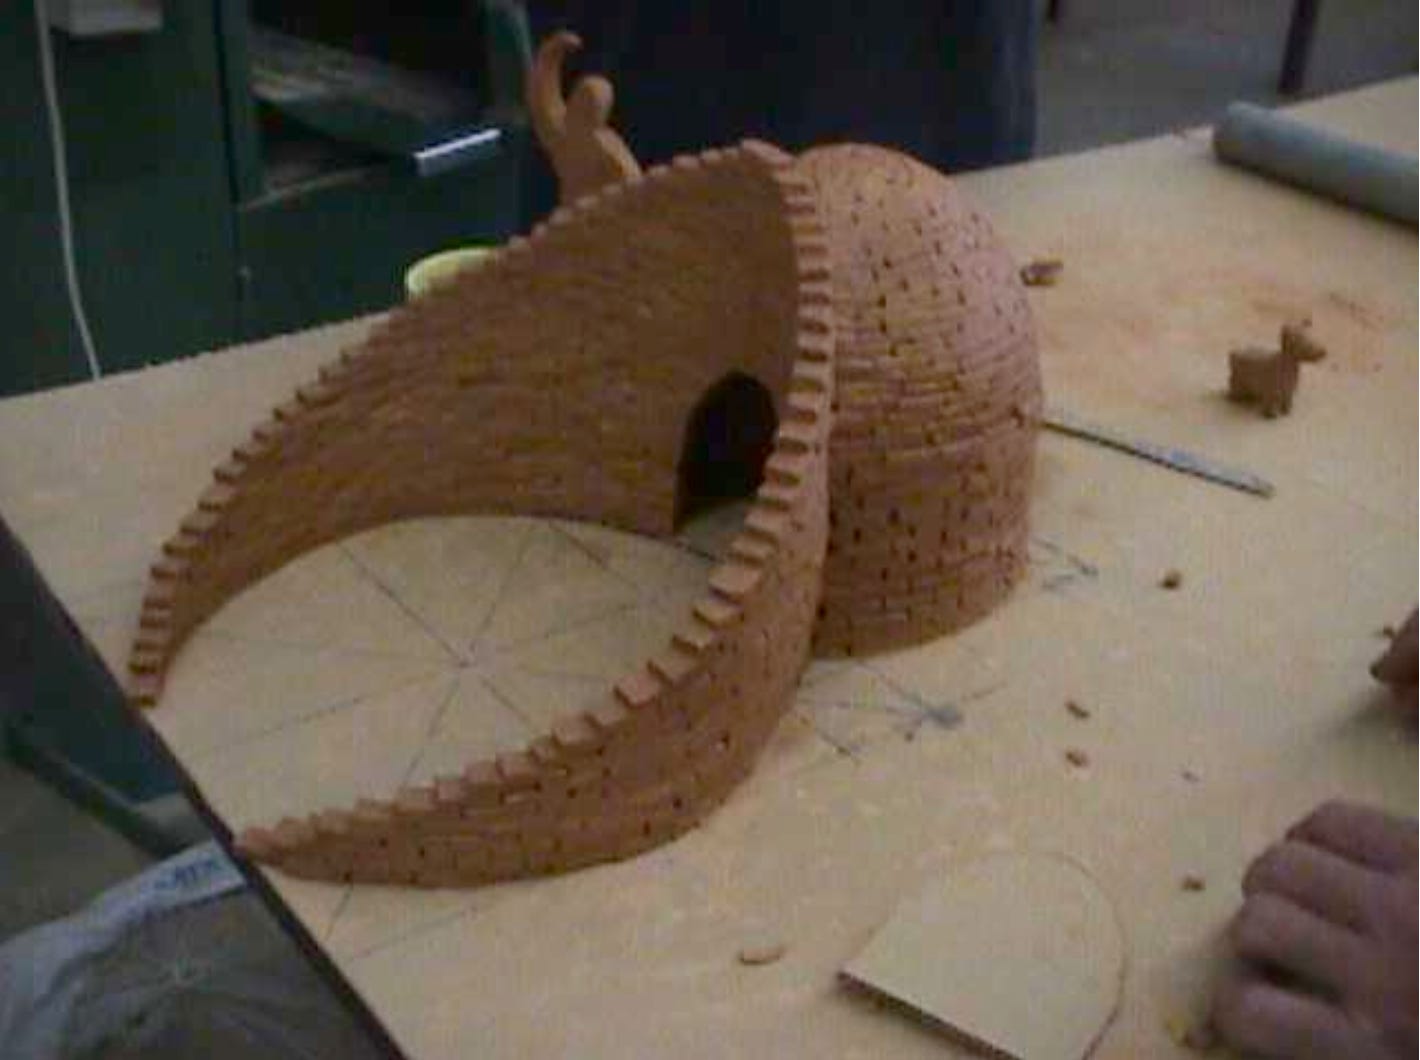
As students created ideas of similar form three models emerged. Students selected the design for further development which featured a circular floor plan of approximately 4m diameter with a curved intersecting courtyard wall which provided extra stiffening across the doorway to the inside (Photo 1). At the time the group also discussed the intersection of the wall and the dome, and it was agreed that a vaulted structure was needed to strengthen this point.
Reflection: To make design models of the dome using potter’s clay, similar fundamental material used in construction was a delight of this phase of the process, and it enabled students to develop a feel for the material at a small scale and making the project less of an abstraction.
After this first phase of modelling and a soil test, advice was sought from an engineering consultant. The group then agreed that the general dimensions should be finalised: a 4m diameter, a 450mm thick base wall up to 1m above the footing, a parabolic dome approximately 4m to the apex from the ground, a vaulted entry about 1.8m long and about 2m high: all on stabilised rammed earth footings 500mm deep and 750mm wide.
A visit to the site by a majority of the students was made to select the exact location and orientation of the dome.
Budgeting
During the design phase a budgeting process was set up; this was to be managed by the students, but given the amount of preparation required on other tasks, the lecturer largely managed this. Students assisted by visiting suppliers and researching prices for a range of materials and equipment that had been identified in the research phase.
Construction Process - Semester 1
Preparatory Processes
There was a range of required tasks to be done for a start to happen in Week 5. Lack of attention by the purchasing group to the concept of “lead time” meant that gear was not secured until Week 6. This was one of the first big learning experiences in the project – it was a significant loss of time. Excavation and site clearing also proceeded early in Week 5.
A group of students determined the sizes of the bricks for both the base wall and the parabolic shell. They also took responsibility for making brick moulds - sufficient quantities of moulds were required to make the process efficient.
Brickmaking
Students determined the brick quantities of each type of brick. Initially brickmaking proceeded on the basis of being unstabilised, but this changed after observing that the bricks were taking too long to dry. It was decided that cement stabilisation was the only way that bricks would be suitable for use early enough to achieve progress on the building by the end of the semester. It also allowed for a quicker reuse of the limited brickmaking space, and for early laying.
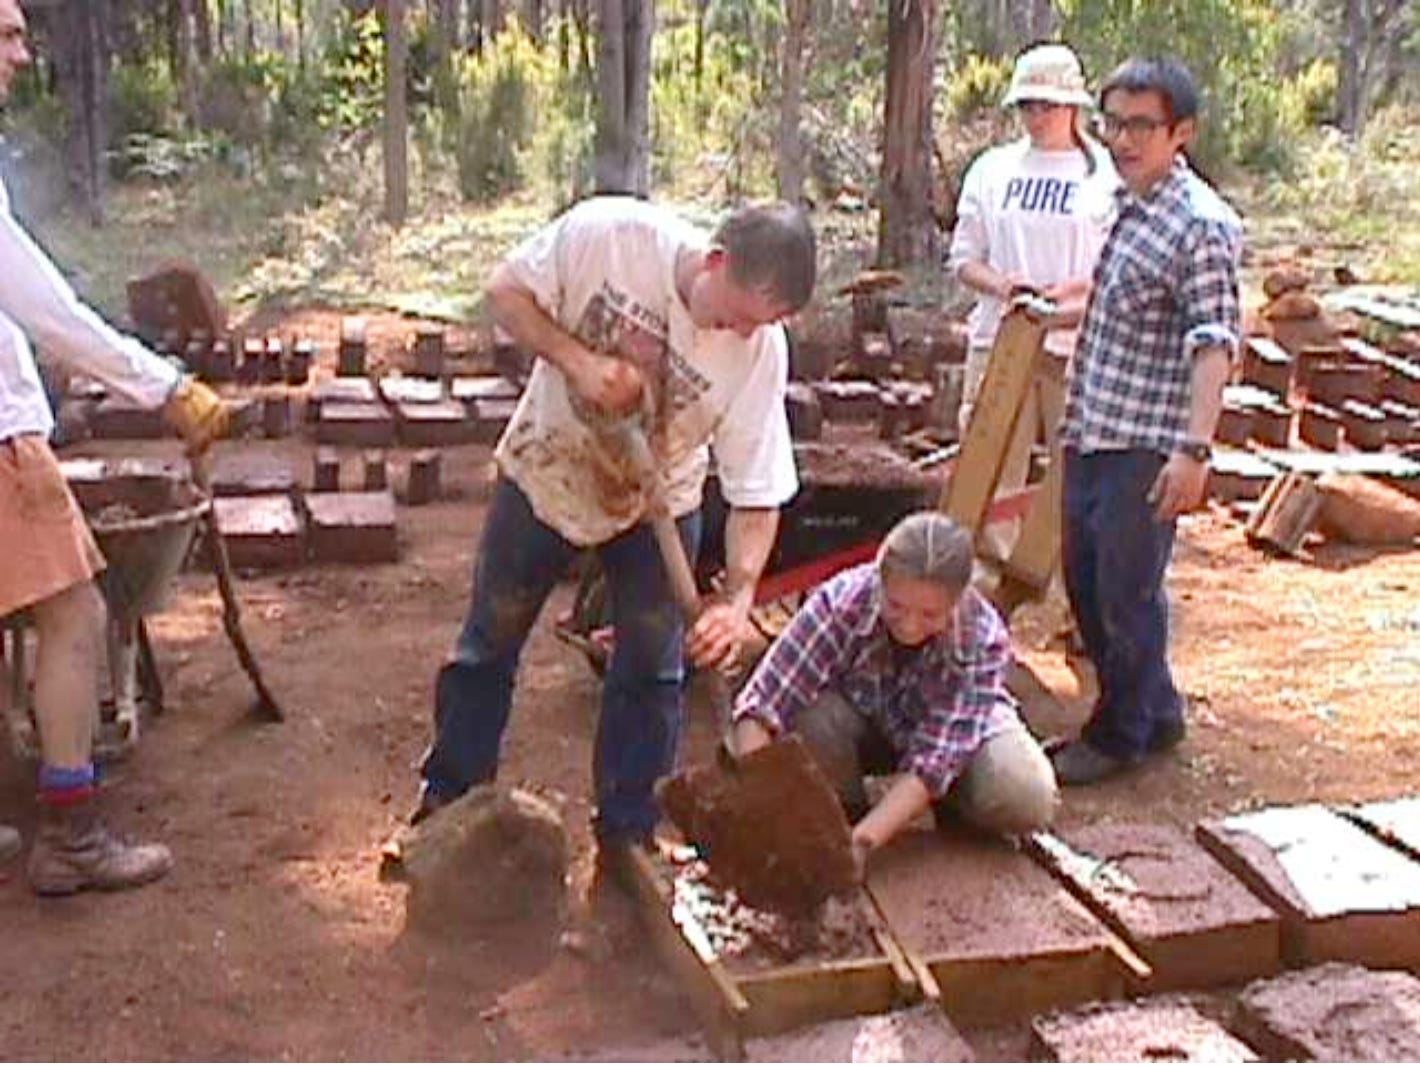
Students decided the process for brickmaking and soon became adept at the brick production process (Photo 2), including setting up at the start of the day and cleaning up at the end of the day..
Reflection: The original approach was to use the natural earth as found on site for the bricks (notwithstanding that we had intended to stabilise the rammed earth footings with cement). The reason for using unstabilised earth for the bricks was that building an earth dome in this environment meant that the building could decay, and the natural materials could be re-used in a different project or used to remediate the pit we created by removing earth materials.
We also ensured that the brick pit was shallow enough (say two bricks deep) and with angled sides, that it wasn’t a trip hazard for anyone walking through the area. And it meant that vegetation could regrow if the dome stayed as a structure.
Building Set Out and Footings
With brickmaking nearing completion, construction commenced in Week 10. The dome site was set out - the stringlines and datum points were re-set, the centre of the dome was pegged, and footings were marked out on the ground using a straight edge, rotated about the central peg and hydrated lime powder. This set-out process was completely worked out and executed by the students without supervision.
Rammed earth footings were then constructed from finely sieved clay soil mixed with 10% cement by weight – the same formula as the stabilised bricks. This mixture was then compacted in situ with mechanical compactors.
Bricklaying
The base cylindrical structure was a simple introduction to the laying of earth blocks, and students adapted very quickly to the process; they were unprepared for the continuing demand for more earth for the mortar. The main difficulty was keeping the wall plumb. Two sessions in Weeks 11 and 13 completed the bricklaying of the cylindrical 450mm thick base wall.
At this point it was agreed that the group would suspend works to allow them to work on their major Design Studio Projects and other assignments, to reconvene after the Folio submission period. It was anticipated that a core group of students would be available for at least a week after Folio submission to commence the bricklaying on the main dome. This did not happen: some students already had organised holiday work, some were too exhausted, some had disappeared on holidays and the rest had lost interest because the dome was not completed within the semester.
Construction Process - Semester 2
Initial Discussions
The Studio was continued in Semester Two with fewer participants and some new faces. By discussion with participants, it was agreed to work two weekdays as well as Saturdays in order to finish the structure by Week 6. The group would leave the dome to cure and return to site in the last two weeks of Semester Two to do the render and to clean up the site. This freed them up to put energy into their other subjects for the majority of the semester.
Bricklaying
In the planning for the laying of the bricks to the parabolic shell, the aim was to use empirical methods, taking inspiration from the traditions of the Nubian Masons, with a little help from the computer to substitute for a few thousand years of building culture.
It was decided that a template was needed to give shape to the dome and to identify the brick courses. Robin Green, the Architect Workshop manager developed a rotating template base, using a dumpy tripod. A group of students did detailed calculations of parabolic curves to arrive at the most integrated engineering arrangement. This was translated onto the flat bed router that cut out the 1:1 template from plywood.
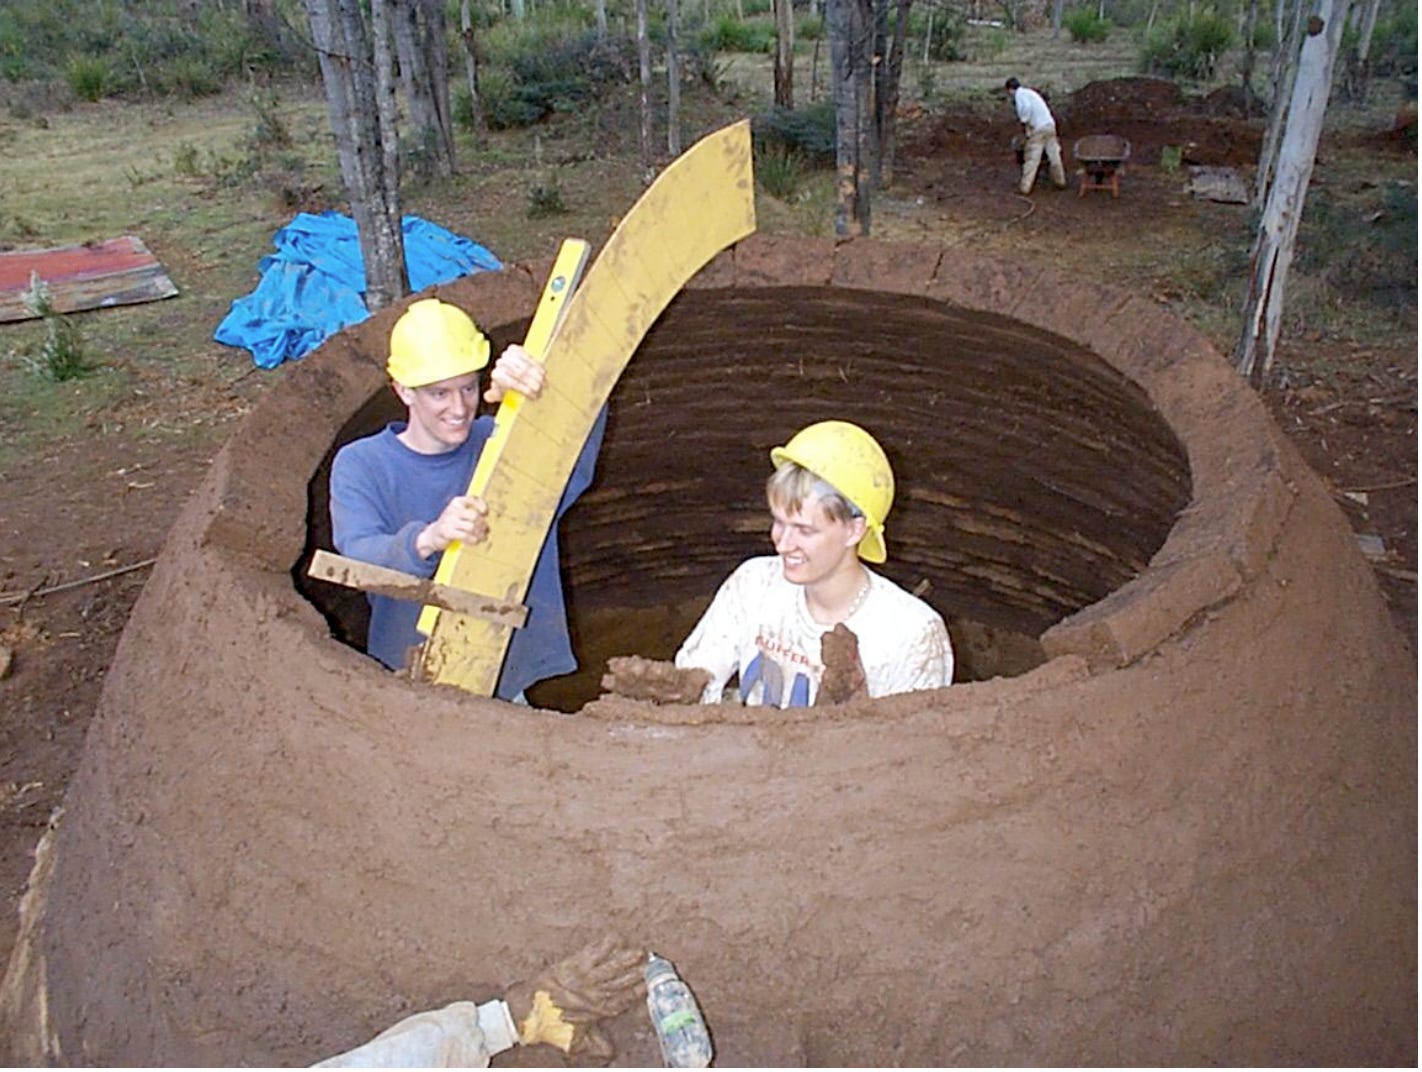
One of the great concerns was whether the bricks would adhere to the wall, especially where the slope was increasing. Laying of the brickwork for dome proceeded with minimal problems. After a bit of adjustment, the template worked well and was able to keep the curvature going. This was a very satisfying period with high levels of enthusiasm and wonder, especially when it became obvious that the dome was not going to collapse. (Photo 3) The word “awesome” was used extensively. Only once did a brick fall off the wall after laying.
Reflection: This was a brilliant process and enabled the students to lay dome bricks symmetrically, following the correct curvature, which was essential for stability, especially in the lower third of the dome. Creating a dome was risky, but care and consideration by students achieved a stunning outcome.
By Week 6, bricklaying was complete. This included building some buttress walls to the entrance vault and a low wall for seating. The Studio group reconvened in Weeks 11 and 12 to finish off.
Rendering
During the recess, research on rendering techniques continued. The student who was originally assigned this task at the beginning of Semester One continued with this research. A 20mm cement-stabilised render with PVA additive was applied, and coated with a breathable stabilised earth water repellent.
Flooring
Early on in the process, a poured earth floor was considered, but the site excavations produced a substantial quantity of stones. Some students were keen to lay a stone floor in a stabilised mud mortar using the waste stone. The poured earth experiment was off the agenda. They carried out the floor laying while the rendering was in process. In addition, many of the large earth blocks were used to make seating inside the dome, and this was carried out at the same time.
Internal Finish
The interior of the dome proved to be quite dark, even with bottles laid in the wall. It was decided to do a traditional whitewash to the interior. This was slapped on very quickly, without much care about other surfaces.
Fireplace
A fireplace, hood and flue were installed. A group of students were determined to make this work – they had a vision of using the dome as a meeting place. This phase went through many smoke-filled stages, developing a life of its own and it continued beyond the completion of the dome project.
Reflection: I was very doubtful about this step, and I think it would have been better to stick to the original plan to create a skylight from glass bottles. I gave my opinion, but did not impose it, so the students ran with their flue idea, which was sourced second hand. I acknowledge that students were very happy with their decision.
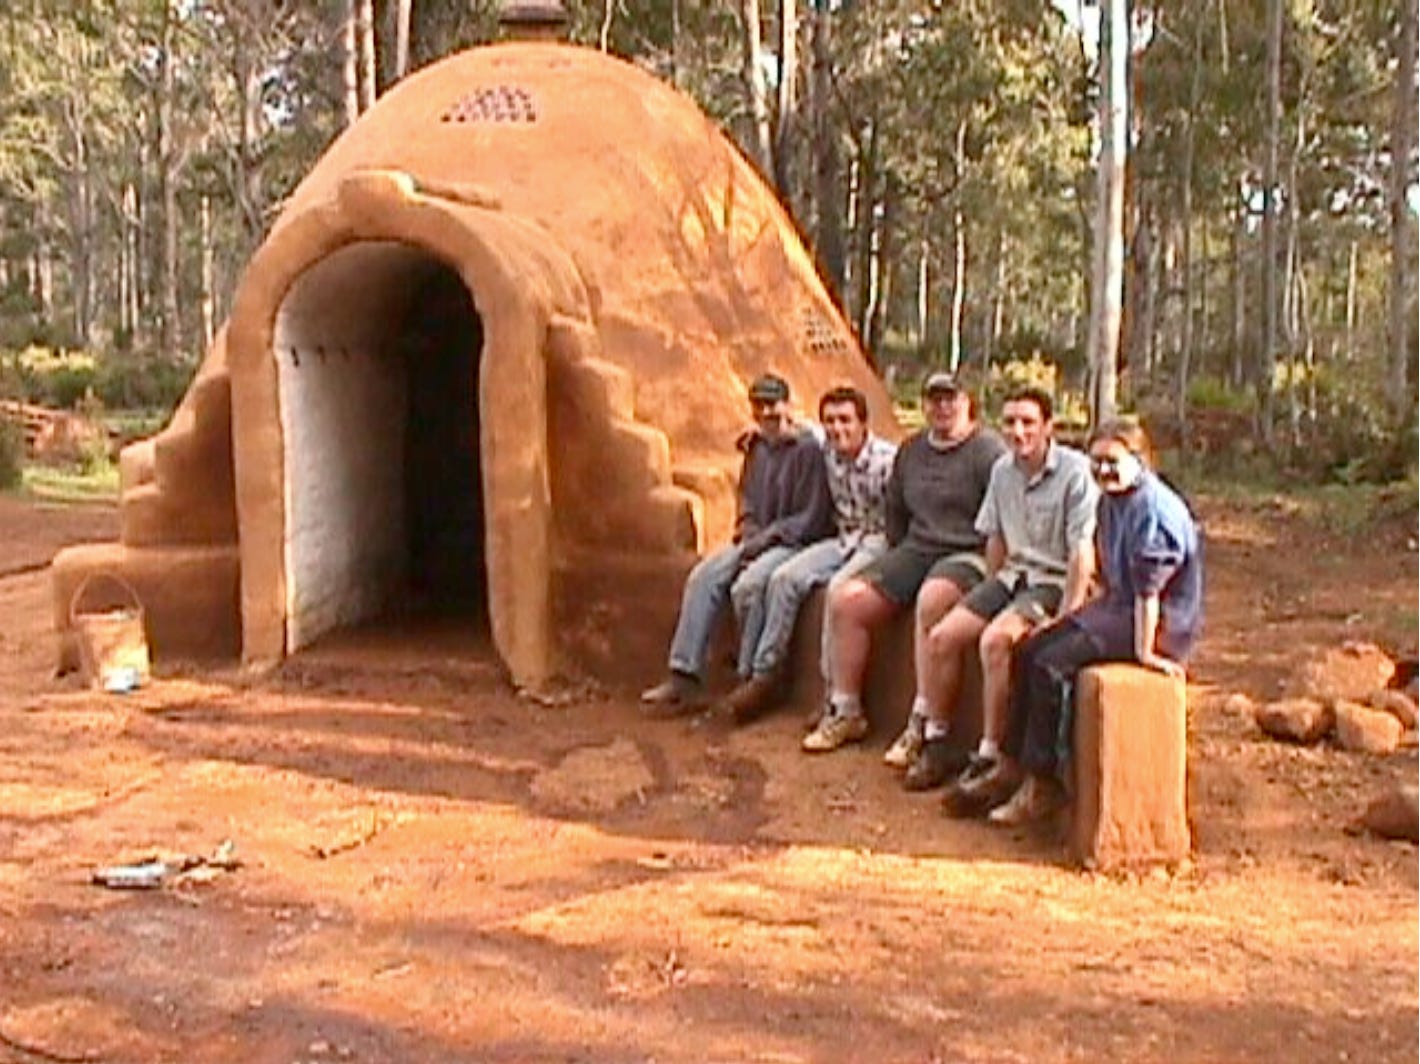
Timeframe
At the completion of construction, this project, although started in March and completed in October, required a total of 24 days on site for brick making, bricklaying and finishing. (Photo 4)
On-site design detail resolution and technical problems
As part of the enablement process, students were encouraged to think ahead and make decisions about what would need to be done each week, without prompting from the lecturer. The site-based decision-making process challenged many students, especially when they felt on top of a particular process and didn’t want to deviate to accommodate change or to introduce new materials or a new process.
The students made many mistakes and errors of judgment during the mud-brick making and construction stages, largely due to challenges of decision-making. When errors became evident to the students, they were given the option of removal, amelioration or acceptance of the work. These decision-making processes represented the major learning experience of the project. Some of the technical problems included:
Incorrect placement of damp course
Inappropriate positioning of bottles for light wells
Maintaining curvature
Underestimation of brick quantities
Co-ordination of template and scaffolding
Poor quality of render.
The decision not to render internally
Laying the floor before whitewashing
Final cost
Construction of the dome was achieved within the lower end of the usual Learning-By-Making Studio cost range of $3,000 to $5,000. Taken over two semesters this cost is acceptable, given the intensity of the project and the outcomes achieved.
Assessment
In Semester One, assessment was based on:
The demonstration by the student of having achieved the Unit Objectives
Quality of participation, with evidence of participation through attendance records, self, peer and teaching team assessment
The compilation of a Log Book which recorded the process of research, design and construction.
Assessment in Semester Two was similar to that of Semester One, except that there was no requirement for a Log Book or similar.
The Log Book became a point of contention towards the end of Semester One, because many felt that it was a cumbersome way of communicating their experience. The group held a meeting on site to discuss its pros and cons. The lecturer, however, contended that this may have been unfair on the students who had kept up with the Log Book, and the wishes of such students should be considered in their deliberations. The lecturer did not participate and gave the undertaking that the group consensus would prevail.
The consensus was that students could produce any form of recording the process of research, design and construction. Work handed in was in Log Book format, report format, pictorial summaries and a video summary among other things. Work handed in under this part of the assessment generally measured up to the assessment criteria.
For both semesters, students were asked to rate their own and their peers’ participation and performance in terms of contribution and team work. Criteria for rating performance were given.
One problem with this process is that with a large group, some students were not aware of the extent of the contribution of others. Students were advised that they could abstain from assessing peers where they felt they had insufficient information about their peers’ performance. This occurred in several assessments. It was also interesting to note that some average performers rated themselves as high distinctions, possibly in the knowledge that their peers and the lecturer would mark them down.
Student evaluation of teaching and learning
As with all Units at the University of Tasmania, students are given the opportunity to evaluate the performance of teaching staff and general Unit issues. This is a formal process managed by a discrete division within Student Administration. The evaluations are considered as part of the Performance Management System and are also used as a teaching performance benchmark for academic promotion.
Student evaluation of the studio indicated a high level of satisfaction and appreciation of the process of making their own decisions. There was, however, obvious frustration from some students that the dome was not completed within the timeframe, even though it was made clear at the outset that completion was not guaranteed. This frustration may in part explain the attrition rate from Semester One to Semester Two, whereby only seven of the original twenty elected to continue; it is also likely that positive feedback from the continuing students may have been instrumental in recruiting four new students. Other Specialised Studios on offer in Semester Two can also explain lack of continuation of Third Year students.
Comments from student evaluation in Semester One include:
“The openness of the lecturer to student ideas and directions is unique; it allowed the project to be ours rather than his.”
“Eventually enthusiasm by students waned and the weather was not in our favour to complete the dome.”
Semester Two comments included:
“The opportunity to have a Unit spread over two semesters opens up lots of extra opportunities for building and experimentation.”
“It was fun to be able to work outside from the classrooms – to be outside encourages everyone to have fun.”
“It was good to be able to have a lecturer place himself at our level and be eager to teach us and also learn as he was going along.”
Conclusions
The outcomes of a Studio like this cannot be measured by number of bricks made and laid, and whether the dome was finished within the timeframe. All Unit Objectives were generally achieved although, with respect to the group work objective, the Semester One crew became a bit fragmented in the middle of the semester, with some students happy to stick with one task and one sub-group. The process didn’t become cohesive until footings and bricklaying started.
Informally, however, there were wider and no less important outcomes:
Inter-year discussion between second and third year students
Social discussion and jam-sessions around the camp-fire
Extensive reflections on our approach to dome building
Team building, particularly in Semester Two
Acknowledgement of the power of the object that had been created, and the ensouling of the internal space by sitting in silence or chanting as a group
Positive comment from other teaching staff, students and members of the public who use Hollybank for recreation.
Finally, the opportunity to do projects of this scale and complexity should, in future, be considered in the context of two semesters from the outset.
Reflection: Over 20 years later, I still find it hard to believe that we did it. The project could have failed in any number of ways, yet every problem was worked through with good results.
In hindsight, I also think this was one of my first big experiments with emergence, in as much as I set the parameters of the project including the site with its constraints, worked the students into the project by modelling and research, and then let them make their own decisions and test them in safe-fail experiments based on the patterns that emerged from their interactions with the brief and the context. All I had to do was create feedback as appropriate, and help them to amplify or dampen actions and look for patterns emerging in their local system.
The confidence levels of students were sky high at the end, which I’ll take as justification for the approach. I left UTAS Architecture two years later, moving back to the mainland. My only regret is that I didn’t stay to deal with the collapse of the dome and to see the material returned to the earth. I understand that it was demolished completely at one stage, so I’m hoping that the logical thing was done and the material was used to fill the mud brick pit.
I often wonder what kinds of things we could have achieved with experimental buildings if I had have stayed on. I am still in contact with students from that period in my life, and many have gone on to great careers in architecture and related professions, and many have their own practices, here in Australia and overseas.
References
Student Evaluation of Teaching and Learning, Dome Specialised Studio Semester One 2000, University of Tasmania June 2000
Student Evaluation of Teaching and Learning, Dome Specialised Studio Semester Two 2000, University of Tasmania November 2000
Dewsbury, Mark DOME Specialised Studio Log Book, University of Tasmania October 2000
Parnell, Matthew Lecturer’s Studio Notes and Files, University of Tasmania, October 2000